I think each thing you make is a learning experence particuly when starting out. I look now at the things I first made and cring at how poor they were. Yet I remember being so proud of thouse when I made them and I know if not for the mistakes i had made along the way the things I'm making now wouldn't be as good.
Yet the temptaion is there to just pull apart the old ones and make them as I could now and most of the time I find it better to just start from scratch and then at the very least I have the two to make side by side comparsions on.
A redo is normally the best option but every now and then it's better to just pull something out if there's one small thing you don't like. You may remember this little guy from a past post.
I'm sure you can guess what i wasn't happy about with him. yes his wiskers.They were too dark, too thick and looked like tendrills coming off his face. I had made them with the wire form a twist tie that I coated with glue and then wraped yarn around. However the only way i could see to start it was to hold the yarn under and wind aroudn it and the wire for the first part wich left me with a fat end and a skinny end. Luckly they were easy to pull out and replease.
This one I'm much more pleased with. Doing the wiskers in white made them stand out less and this time was able to get the yarn tight on both end by meerly coating half the wire, starting in the middle and wraping to the end and when that was set going the other way. Howerver this is not the first mouse I made. This is where the value of side by side comparsion comes in.
The big difference being the eyes, the ears and the body shape. Before I was able to find safety eyes I had to crochet eyes and oddly this was one of my best pairs as they didn't look that big in comparson to the face thanks to the ears. I wanted the ears bigger though to add to the cuitness so I simply made them with a larger hook. They body is thes same pattern worked differently. the first pattern book I got instructed to work only in the back loops witch makes your stiches taller but makes a line sprialing aroudn the outside of your work. Starting out this actually made things easier as it was quite easy to count my rows if I lost track of them by counting the lines. So when I started doing other patterns I assumed they were back looks as well and kept doing that on my own.
It was only later that I started to learn that it it was more common to work in both loops and why and I really did prefer the shape and more fabric texture you get from working in both loops. For my moust that ment a more round cubby body instead of a long thinner one that looked more like a rat. you may also notice i did something different for his wiskers too. On the first one I used black yard, frayed it and then coated each strand in glue. It was messy sticky work and they still droop slightly not giving me the effect i wanted at all.
Yes that's a final fantasy Moogle the antena for his pom pom was where I first learned the trick with the wire and the yarn and i didn't care if it was a little thick. this little guy was my first selfmade pattern that I was 100% happy with when I made him....or rather about 95% happy with him as there was one small problem.
*cring* for thouse not familar with them Moogles have bat like wings that are tipically drawn in darker blue, pruple or even black. Scolops, or rather concave scolops are nerally imposable to do in such a small scale and to make matters worse the yarn that was the only thing close to the right colour that I had was thick and coarse and kind of rough. This had been my 5th attempt though and any look online showed that most people that made moogle dolls made felt wings for just this reason.
I resgined myself to this being the best I could do and put him aside as finished. Sometime later I find this lovely shade of purple in the clearance bin at Hobby Lobby and when I get it home realize this fine soft thread is the perfect shade for moogle wings. Five more atempts later and:
I don't know if the picture shows it clearly enough how much better this is than the last one though it did take another 5 ateptes to get there but the wing has a much better bat shape now. Yes I made him a little scarf but just because this little guy is going to be one of my Craft Along donations for the Desert bus for Hope fundraiser and I figured he should were ther Loading Ready run colours for that.
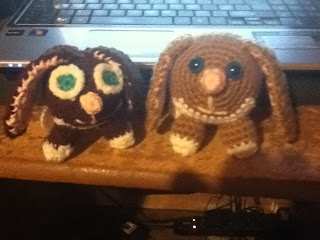
I have two more redo's that I want to show the first is one done at aroudn the same time as the first and second mouse and for much the same reason as I now had safety eyes and wanted to work in both loops.
I have a friend very fond of rabbits and kind of disapointed that she can no longer keep one as a pet do to alergies. So when I first started to make patterns on my one making a bunny was the clear choice. I did learn a lot though, his eyes are really the same size as the ones on the first mouse but they look so much bigger due to not haveing the big ears above them and the front view of the ears being quite small. From that I knew I could get away with bigger eyes on the mouse then I could with the rabbit and used two different sizes.
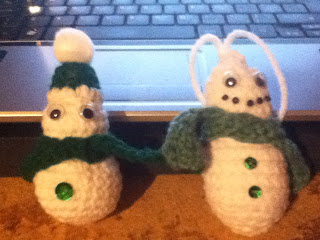
My last picture for this post is of a simple something I made. A snow man christmas ornimant. This one is not my original pattern but i did modify it a bit but the orignal pattern can be found Here.
The original one on the right came out a bit more pointy than I wanted and...well frankly to me atleast looked more like a festive turd than a snow man. They guy on the right came out all round and jolly so I made him a little hat with and over sized pompom. I just wish I had some fluffy yarn to edge the hat in because using the same white I crochet the snow man in doens't give the contrast I wanted.
So what do you guys think? have these improvements been woth the extra work and the ability to be able to see how far I've come since i started?


No comments:
Post a Comment